

07/23/24
If troubleshooting is an art, troubleshooting a complex embedded device like a Software Defined Radio (SDR) is doubly challenging.
As an SDR engineer, I know what it’s like to design a product you and your team are deservedly proud of… only to get an email the next morning from the customer support team asking for your help resolving an issue.
When this happens, I have three options:
A) Immediately start going down the troubleshooting rabbit holeB) Deny responsibility and pass it off to someone else
C) Go straight to my project management team, clarify that troubleshooting this issue is a priority, and let them know this will take significant time and resources to fix
Of course, the third option is almost always the best approach. If I’m lucky, my project management team is tech-savvy and understands that engineering comes with its own set of challenges. That being said, they still need to be able to weigh risk vs. reward and potential cost vs. potential revenue. To that end, they may ask me to answer questions like “How much more time will this take?” and “How much more could this cost?”
While I may not know the exact answer at this stage of the troubleshooting process, I still need to give them some kind of estimate. Just like design and development, any troubleshooting effort can benefit from sync-ups, clear communication, and documentation.
6 steps for troubleshooting
Once my project management team gives me the go-ahead, I can dive in and get my hands dirty. Specifically, I like to follow six steps.
Step 1. List all possible causes
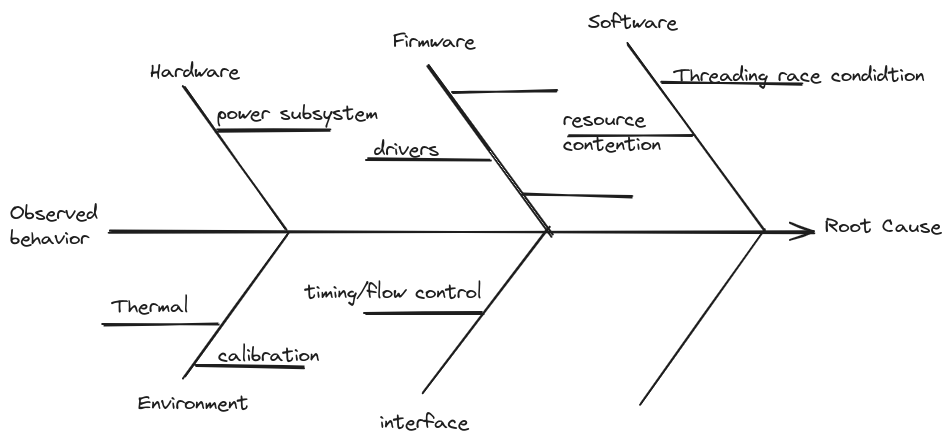
Assemble your team, sit down together in front of a whiteboard, and do some brainstorming. I like to start with a fishbone analysis: list all the possible areas where something could go wrong, and include every potential cause, no matter how improbable.
Now, rank all the listed causes from most to least likely.
Step 2. Devise tests to eliminate those causes
Once you’ve listed some potential causes, it’s time to eliminate them one by one. To do that, you need to devise some ways to test each cause.
Identify the resources you’ll need to execute those tests. For example, will you need any special test equipment? Additional software? Will you need to automate the testing to catch that 1-in-100 bug?
Next, figure out how much effort each test will take. Which tests will only take a day to perform, and which will take a week? Which tests can one person knock out, and which tests will require a team of cross-disciplinary engineers?
Step 3. Prioritize testing by effort and probability
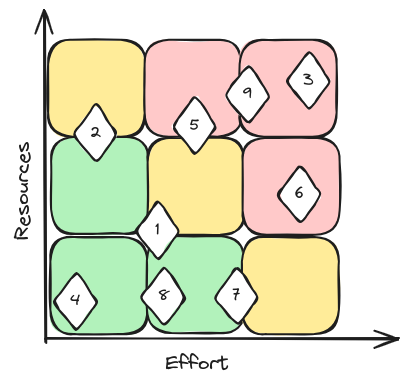
With brainstorming done, you can now chart the probable causes, the effort required to test them, and the amount of resources required to perform those tests. Then, it’s time to prioritize.
In the example diagram below, you can see that the most probable potential cause (1) is lower on the resource/effort scale. Since it’s the most probable cause and one of the easiest to test, it should probably be looked into first. Meanwhile, 9 is less likely and will be costly to track down, so it should probably be investigated last.
Step 4. Present your plan to management
Now that you have a plan, it’s time to share it. Provide management with a series of If-then scenarios and let them weigh in on priority and execution strategy.
For example, you might end up deciding something like: “It will take us two weeks to investigate 1, 4, and 8. If it doesn’t turn out to be one of those causes, we can assess whether it’s worth investigating number 2.”
Step 5. Delegate appropriately
You can minimize the amount of effort and resources required by properly staffing your troubleshooting investigation. For instance, you probably don’t need your PhDs coding the automation software and running the tests.
Identify work for your less experienced engineers, then give them clear instructions on what kind of data you want to collect and how you want that data organized and presented. This is a valuable opportunity for your junior engineers to learn the art of troubleshooting, and in addition to helping you, it will add to their skill sets and career development.
Step 6. Review the results with management
Set up a process for reviewing the collected data and results. It’s quite possible that results from one test will increase or decrease the probability of another potential cause. Revisit and revise your plan accordingly–and keep project management informed of your progress. Now that you have a written plan of attack, they can see you cross items off the list during your status meetings (this will make them happy).
Instead of “I haven’t figured it out yet”, management can use your plan and status to compute metrics, calculate costs, and weigh risks and benefits. This style of communication helps them understand the ways you may be struggling and can help them figure out how to get you the resources you need to continue.
Stick with it
Troubleshooting is a necessary part of the engineering cycle. The process is always frustrating, full of dead ends, and often stressful. But I hope this simple guide makes it more of a paint-by-numbers exercise rather than a shot in the dark.
Keep your head up, take a moment to celebrate the small victories, and know that you’ll uncover the root cause eventually if you just stick with it.
most popular
Why Epiq's Taking a Leap… Into Space
READ BLOG